
Hey mamas! Pushing during labor is an intense but empowering experience. For lots of mamas pushing is the most exciting part of labor because it’s the final moments before you finally get to meet your baby. While exciting, pushing also gives lots of women anxiety, and rightfully so.
It can be a little hard to wrap your head around pushing a whole human out of your vagina. Today we’re going to get into all the details of the second stage of labor, aka pushing, so you know what to expect and how to push during labor like a boss!
The Stages of Labor
I’m going to do a quick review of the four stages of labor. Many people think, “oh I know what labor is, it’s contractions.” And while you aren’t wrong in that thinking, there’s more to it than just contractions.
Stage 1: Contractions and Dilation
The first stage of labor begins with the first true labor contraction and ends when you are 10 cm dilated. This is likely the stage most people think of when they think of labor. This stage is broken down into three sub-stages: early labor (0-4 cm), active labor (4-7 cm), and transition (7-10 cm).
Stage 2: Pushing
The second stage begins when you are dilated 10 cm and ends when you deliver your baby. There are always exceptions but if you are a first-time mom you can expect to push for around 2 hours. For some, it’s much faster and for others, it might take up to 4 hours or so but 2 hours is the average pushing time for first-time moms.
Lots more to come on pushing!
Stage 3: Delivering the Placenta
Begins with the delivery of baby and ends when you’ve delivered your placenta. This is by far the shortest stage of labor. Birthing your placenta is far less painful than giving birth to a baby. I know it sounds weird but pushing your placenta out feels like giving birth to a big mound of Jell-O. Typically we give mamas around 30 minutes from birth to deliver the placenta. If your placenta does not come out within 30 minutes, the large majority of them do so don’t stress, it might indicate something is going on and your provider might have to be a little more aggressive with their efforts to get it delivered.
Stage 4: First 1-2 Hours After Birth
You finally aren’t pregnant any longer. The fourth and final stage begins with delivery of your placenta and ends around 1-2 hours postpartum. You can expect your nurse to be checking your bleeding, feeling the firmness of your uterus (from the outside), and monitoring your vital signs closely during this time.
Push it, push it real good!
Back to the second stage of labor: pushing! Now that you know the 4 different stages of labor we can take a deeper dive into all things related to pushing as we focus on how to push during labor!
When to Push
It is important to wait until you are fully dilated, 10 cm, before you begin pushing. A lot of women feel a pretty intense urge to push as baby drops lower in the pelvis and they get closer to delivery but it’s SUPER important that your cervix is completely gone before you push.
If you start pushing before you are fully dilated you risk cervical swelling or even tearing your cervix. Neither of these are things you want to happen, I can assure you of that. Rest assured that your labor nurse and provider will be working closely with you and guide you on when it’s safe to start pushing.
How to Push During Labor: Pushing Techniques
There are 2 main techniques when it comes to pushing: open glottis and guided. Let’s take a look at each of these below.
Open Glottis Pushing
Also referred to as spontaneous pushing, open glottis pushing allows you, the patient, to take the lead. With open glottis pushing you are encouraged to trust and listen to your body. Your labor and delivery nurse is present to support and encourage you but it’s more about letting your body take control.
You will push when you feel the urge to push. Normally this feels like a pressure sensation in your rectum. With open glottis pushing you will likely push for about 5 seconds 3-5 times per contraction.
Blood flow to your uterus and your baby isn’t affected with open glottis pushing and therefore there is less chance baby will experience fluctuations in their heart rate. In addition, there is less chance you will exhaust yourself with open glottis pushing.
Guided Pushing
Before we get going with guided pushing I just wanted to say that whenever safely possible, open glottis pushing is the preferred method. There are times, however, when guided pushing is absolutely necessary. Guided pushing might needed with a mama that has a super strong epidural and doesn’t feel the urge to push or if baby is in any kind of distress.
During guided pushing you will be guided, usually by your labor nurse, to hold your breath for roughly 10 seconds and channel all your energy into your bum. The goal will be to complete 3 of these pushes per contraction.
With guided pushing, the blood flow to your uterus and baby might be compromised which can lead to temporary changes in your baby’s heart rate. You and your baby are closely monitored during this time and adjustments can be made if baby isn’t tolerating it.
Pushing is a lot of work! I have so many patients that breathe a sigh of relief upon learning they are 10 cm dilated. And I’m here for it, labor is tough and each milestone along the way should be celebrated. I do, however, remind mamas that pushing is hard, physical work and can be exhausting. Guided pushing might leave you feeling tired sooner than you would with open glottis pushing.
My Top Pushing Tips as a Labor and Delivery Nurse
1. Tuck your chin to your chest
Another one of my favorite tricks that I coach mamas to do when pushing. Tucking your chin to your chest and curling around your baby can really give you that extra momentum to move your baby and be more effective.
2. Bear down!
This happens instinctively for a lot of women but not all. You are going to try and channel all of your energy towards your rectum when pushing. And in case no one has told you this yet, it’s common for it to feel as if your baby is coming out of your rectum vs. your vagina.
3. Try and relax your other limbs
It sounds tricky to do when you are using all your might to push it can make a big difference! Keep your eye on the prize, the best prize ever, mama. Some women prefer using a mirror so they can see their progress and stay motivated. Believe me, I know this isn’t for everyone.
4. Change positions
If you aren’t making progress or a particular position isn’t working, switch it up. There are certain pushing positions that are more commonly used but that doesn’t mean you have to be limited to just these.
5. Push with the peaks
Sometimes your body will intuitively know when to push, which is especially true for mamas without epidurals, but this is not always the case. If you are using guided pushing it will be most effective to push not only with your contractions but during the peak of your contractions. This gives you the most “bang for your buck” and can have a more productive outcome.
6. Rest between contractions
Pushing is really hard work and can be exhausting! I always encourage my patients to drop their arms on the bed and try to let their entire body relax between contractions. I know a lot of mamas are pumped up and eager to meet their baby but you want to conserve any energy you might have left so you don’t completely exhaust yourself during this process.
Pushing Positions
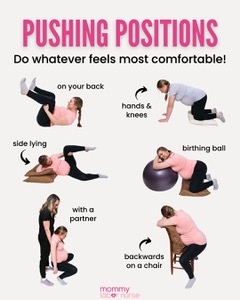
I wanted to briefly touch on some of my favorite pushing positions as a labor and delivery nurse.
- Hands and knees: probably my favorite! This is a position a lot of mamas instinctively go to also which is pretty cool. It can be more challenging to get into this position with an epidural but not impossible (with help)
- Lithotomy (on your back): another very common position for pushing. A lot of women think this is the only position they can push in but it’s not at all true. It is a common position and can be very effective but doesn’t work for everyone
- Side-lying: more of “restful” position when it comes to pushing. Can be done with an epidural in place. Can use a peanut ball to help support you in this position
- Squatting: get gravity on your side! Not recommended if you have an epidural in place, for obvious reasons, but a position that a lot of women without epidurals are drawn to
This is by no means an exhaustive list but just a few of my favorites I wanted to share!
Some Additional Things to Keep in Mind:
- It’s okay (and encouraged) to make noise: Grunting, moaning, or even screaming can help you push more effectively. If making noise is working for you mama then run with it!
- Don’t be afraid to ask for help: This!! I can’t stress this one enough. Your delivery team is there to support you and make sure you’re comfortable. If you don’t feel like you’re getting what you want or need from your nurse you can always request a new nurse!
- Trust your instincts: You know your body best. If something doesn’t feel right, don’t hesitate to speak up. Advocating feels very uncomfortable and unnatural for some but it is so very important!
Hopefully, by now you’re feeling a little less anxious about the entire second stage of labor! Remember, mama, pushing is a powerful and amazing experience and you are totally going to rock it!
I encourage you to check out Mommy Labor Nurse and see all the resources we have to offer! I’ve included a few of my favorites below to get you going!