You might be surprised to find that your glute muscles have a direct impact on your pelvic floor. Everything in the body is interconnected, but who would have thought glutes and pelvic floor could be so aligned?
Because of the glute/pelvic floor connection, you may have noticed your backside became flatter than usual during pregnancy, giving a “pancake butt” appearance – also known as “mom butt.”
Doing glute exercises like these can help!
And if you really want to make that booty strong, join my Glutes Maximized Challenge for only 15 minutes per day! Available in the SLAM app. The challenge is 15 days and can be done any time to help bring strength, lift, and shape to your glutes. Let’s get poppin’!
Why are Strong Glutes Necessary for your Pelvic Floor?
Strong glutes act as bodyguards for your pelvic floor. They are the stabilizers that prevent your pelvis from tilting forward, reducing stress on the delicate pelvic floor muscles below.
When your glutes are strong and your pelvis is better aligned, you will have improved bladder control, less back pain, and better posture. Strong glutes also help improve mobility and prevent injuries.
What Causes “Mom Butt”?
As your belly grows during pregnancy, moms with a weaker core often compensate by tightly gripping and tucking their glute muscles. After giving birth, tucking the butt is even more common as the core muscles are compromised. Squeezing your glutes will make them become weak, leading to that “pancake butt” appearance.
Top 5 Exercises for Strong Glutes (that also benefit the pelvic floor)
1. Glute Bridge (Beginner)
- Lie on your back with your knees bent and feet flat on the floor, hip-width apart. Heels should be close enough that you can graze them with your fingertips when your arms are by your sides.
- Engage your core by pressing your lower back into the ground. Imagine pressing your belly button towards your spine.
- Squeeze your glutes and lift your hips off the ground until your body forms a straight line from your shoulders to your knees. Keep your core engaged throughout the movement, and avoid arching your back.
- Hold the bridge at the top for a second, then slowly lower your hips back down to the starting position.
Aim for 10-12 repetitions for 2-3 sets.
You can gradually increase the difficulty by adding weights or a resistance band once you can perform the exercise comfortably.
2. Hip Extension (Beginner)
- Position yourself on all fours on a yoga mat.
- Drop down to your forearms to take pressure off your wrists. This also puts your spine in a better position.
- Keep your hips square and your gaze down, looking just over the top of your fingers.
- Inhale while your knee is down, then exhale as you lift your foot straight towards the ceiling, lifting your pelvic floor and scooping your stomach in.
- Stop the motion while your foot is in the air to feel a nice squeeze in your glute muscle.
- Don’t get too high up as you don’t want to arch your lower back.
- Repeat on the other side.
3. Hip Thrust (Beginner/Intermediate)
Sit on the floor with your knees bent and feet flat on the ground, hip-width apart. Position your upper back against a sturdy bench or platform, so the edge sits just below your shoulder blades.
If using a barbell, place it across your hips with the weight plates balanced. Hold the bar lightly with your hands to keep it secure, but avoid using your arms to lift the weight.
For dumbbells, position one in each hand resting on your thighs just below the crease of your hips.
- Brace your core by engaging your abdominal muscles and pressing your lower back into the bench.
- Take a deep breath and exhale as you squeeze your glutes and drive your heels into the floor.
- Lift your hips off the ground until your body forms a straight line from your shoulders to your knees. Keep your chin tucked and avoid arching your back.
- Hold the squeeze at the top for a second, then slowly lower your hips back down to the starting position in a controlled manner.
Aim for 10-12 repetitions for 2-3 sets.
4. Romanian Deadlift (Beginner/Intermediate)
Stand with your feet hip-width apart and toes pointed slightly outward.
- Hinge at your hips and grasp the weight(s) with an overhand grip, shoulder-width apart. Keep your arms straight and shoulders back and down.
- Maintain a natural arch in your lower back and engage your core by bracing your abdominal muscles.
- Take a deep breath and exhale as you slowly push your hips back, lowering the weight(s) down your shins. Keep your core engaged and back straight throughout the movement.
- Focus on hinging at your hips, not bending at your knees excessively. Your knees should have a slight bend, but avoid squatting down.
- Lower the weight(s) until you feel a stretch in your hamstrings, typically reaching somewhere between your knees and mid-shin. Aim for a controlled descent, not a freefall.
- Once you reach your desired depth, reverse the movement by driving through your heels and squeezing your glutes to bring the weight(s) back up to the starting position.
- Inhale as you return to the starting position.
Maintain a neutral spine throughout the movement. Avoid rounding your back or sticking your chest out excessively.
Choose a weight that allows you to maintain proper form throughout all repetitions. Start with lighter weights and gradually increase as you get stronger. Keep the weight close to your body throughout the entire movement. Focus on using your hamstrings and glutes to lift the weight, not your lower back.
5. Split Squat (Intermediate/Advanced )
Start standing with your feet hip-width apart.
- Take a large step forward with one leg, planting your foot firmly on the ground. Your front shin should be roughly vertical, and your front knee shouldn’t extend past your toes.
- Extend your other leg back, resting the ball of your foot on the floor or a slightly elevated surface (like a bench) for added challenge. Keep your back heel lifted.
- Engage your core by pulling your belly button towards your spine and maintain a tall posture with your shoulders back and down.
- Take a deep breath and exhale as you slowly lower your body down by bending both knees. Your front knee should track over your ankle, and your back knee should bend towards the ground but not touch it.
- Aim to lower yourself until both knees form roughly 90-degree angles.
- Push through your front heel and squeeze your glutes to drive yourself back up to the starting position.
- Inhale as you return to the top.
How often should you do glute exercises throughout the week? How many glute exercises should I do per workout?
Training your glutes 2-3x a week is a great goal. I recommend doing 1-2 glute exercises per workout.
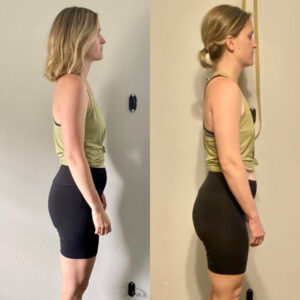
Glute Results with SLAM: Before & After
The SLAM program includes exercises that work your glutes so you can have a strong foundation and support your core and pelvic floor. Around here, the results are affectionately known as the “SLAM booty.”
Check out some SLAM moms’ glutes transformations in these before & after photos: